♻️ Turn waste into garden gold — compost like a pro!
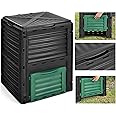
This 300L compost bin combines eco-friendly recycled plastic construction with a smart airflow design to accelerate composting. Its compact 61x61x82cm size fits neatly in any garden, while easy-access lids make managing organic waste simple and efficient. Perfect for eco-conscious households aiming to reduce waste and enrich their soil naturally.
| Product Dimensions | 61 x 61 x 80 cm |
| Part number | 300LCompester |
| Material type | Plastic |
| Capacity | 3E+2 litres |
| Manufacturer | Optimal Products |
| Item model number | 300l Compester |
| ASIN | B0D7QFB3L6 |
S**H
compost bin
Delivered when said quite easy to fix together apart from the lid which was tricky but with patience and a little pressure it was good. Very sturdy
M**Y
Great design! With careful prior preparation, it takes no time to construct properly …
A very good design! I did notice a few niggles in the reviews prior to purchasing, but have a few tips that might help prospective future buyers.The composter comes well packaged, and it might be helpful to have a few things in place before attempting construction, which although very straightforward, and taking very little time, might prove an obstacle if no preparation is carried out beforehand.1 … I suggest that you choose an area indoors with carpeting and reasonable space.2 … A rubber mallet, about 750g in weight, and a small Stanley knife, will also be found very helpful in putting the whole unit together.3 … Slide the contents of the packaging box onto the carpet sideways, with the box on the carpet itself. The diagrammatic instructions are tucked at the bottom end.4 … There are 6 parts … 2 sides, with “Composter 300” impressed into the moulding, which will tell you which way up these go. 1 front, with a cutout lower section for the door where compost will be removed once seasoned. A small green door, which fits over the above cutout section. A rear panel, which is similar to the front, but there is no cutout. This will indicate that the solid blank fits opposite to the cutout at the front in construction. A large top access door, with rear connecting lugs makes up the 6 pieces5 … Lay the back onto the carpet.6 …Each side has lugs, which will be accommodated into this back, if you navigate them into doing so, and then push downwards with reasonable pressure, so that both sides click into place. If they don’t all click, don’t worry, or apply too much pressure. The sides will now be fitted to the back, even if there are slight gaps at this stage.7 … Bring the front section over the two sides, which will be upright at this point, and locate the same lugs that connected the back into this section, and push downwards once they are located into this front section, applying reasonable pressure again, but not too much. Again, clicking will occur, as the lugs locate together, but don’t worry if not all make full connection.8 … At this point, the unit is best lifted, so that it stands on the carpet, in what will be it’s eventual appearance, with cutout on the floor, and the large door access on top.9 … You will now be able to see quite clearly where there are slight gaps between the side panels, and where they connect to the front and rear panels. This is where the rubber mallet comes in … and ONLY the rubber mallet.10 … Where there is a poor connection, give a smart firm hit over either the back or front panel, over the spot where any gap appears. Be firm, but don’t think you are attempting to test your strength at some fairground, it’s a firm, controlled hit. This will easily make good all loose connections.11 … Now to fit the top access door, or lid, as it might be called. In my case, I discovered a lot of excess moulding plastic around the lugs, which connect this lid to the composter. Also, each side of each lug has some excess, which will foul attempts at any connection. So taking your Stanley knife, carefully remove all excess plastic around these lugs. Once all excess is removed, then connection to the composter is straightforward.12 … Place the lid onto the composter, with the lugs DIRECTLY OVER the rear panel, and where these lugs will be connected. Again, taking the rubber mallet, and ONLY the rubber mallet, give a smart, but firm hit over each lug, until the two outside points of each lug fit snuggly into their respective indents on the rear panel.13 … There only remains for the green sliding front door to be fitted, and this is carried out by sliding it into place from above the cutout at the front.14 … Job done!!What isn’t mentioned, but can be seen from the design, is two fixture points in the panel above the sliding door. This is where you can place the sliding door, when you have eventually made your compost, wish to place this door somewhere … and this is where you put it, so as not to lose it … it just slides into these two points.Hope this all helps …
R**H
Good product apart from lid.
Why did you choose this product over others?:Good cost effective easy to build apart from the lid which i had to modify to fit.
S**O
Messy
Chipped plastic comes off everywhere while building. I bought two and they both did it.
J**S
Quite sturdy
Excellent size, the top needs careful fixing.
M**G
Assembly care needed but otherwise excellent product.
Arrived `self assembly' which was unexpected but was easily put together if the diagram is followed. Although there is embossed information on the side panels and it is obvious which way up the front panel should be there are no such markings on the back. Unfortunately I did not read the diagrams carefully enough and attempted to assemble the unit with the back panel upside down. This took ages and a lot of effort to dislodge it from the `click' fastenings. It might be useful if composting instructions/suggestions were included with the package. There was an unexpected benefit from the ventilation holes which allowed me to attach troughs of plants to the side of the structure. I used a trough of Lavender which - when it comes into flower - will help to negate any odour that might emanate from the rotting compost.
A**R
Value for money. Does what it says on the tin ( no pun intended!)
Despite some bad reviews, which nearly made me not buy this product, I was pleasantly surprised by how sturdy is. Very easy to assemble and the lid clicks into place at the back and closes with ease. Perfectly good value for money for a compost bin! Would recommend.
G**R
Good price
Bought 2 of these easy to assemble. Good value for the price. Would recommend.
Trustpilot
1 week ago
1 week ago